bought a brand new Kindle, but still do not know how to configure the device? With just a few steps you can leave the e-reader for you to get ready to read their digital books. To help you, the TechTudo rode this tutorial with everything you need to configure your new Kindle.
 Paperwhite Kindle allows you to read in the dark (Reuters)
 For this walkthrough was used Paperwhite Kindle Wi-Fi, touchscreen version and lighting system that allows you to read in dark or bright light environments.
Step 1. After turning on the Kindle, the first screen shows the options to the system language. Simply select “Portuguese (Brazil)” and, after confirming. Wait for the next screen loading bar.
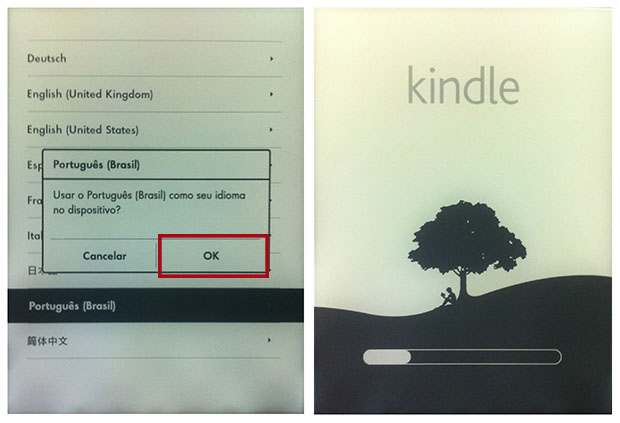 Once powered on, the Kindle asks to choose the system language (Image: Playback / Daniel Pinto )
Step 2
. If you turned on the Kindle for the first time, you see the option to set up a wireless network so that all services operate correctly. Select “Connect to a Wi-Fi”.
Step 3. Select your network and enter the password suapreferência. If this did not appear in the list, select “Rescan”.
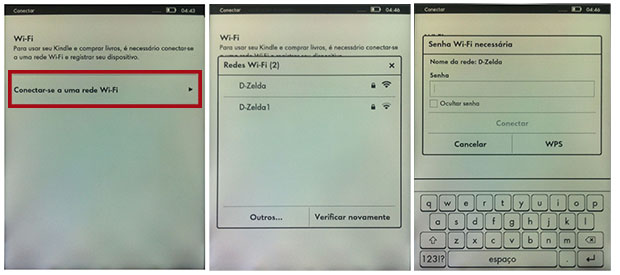 To configure the connection, simply select the network and choosing a password (Picture: Playback / Daniel Pinto)
Step 4. With the Kindle connected to the Internet, you must register it on Amazon to access e-books bought online. If you already have an Amazon account, either. ‘With’ or ‘com.br’, select “Use an Amazon account exists.”
Step 5. Place your registered email address and password. Then select “Register”.
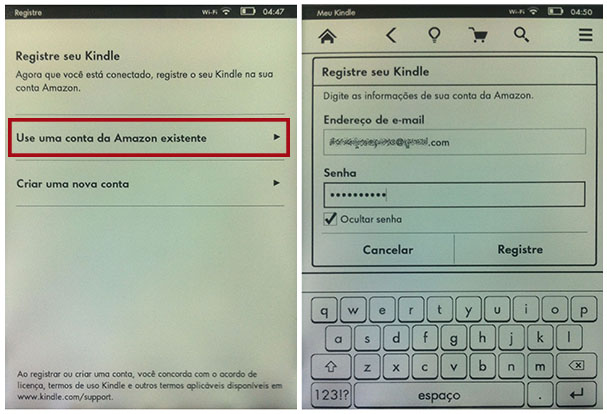 To use the services of Amazon for the Kindle, you need to register it (Picture: Play / Daniel Pinto)
Attention! If you do not have an Amazon account, select “Create new account” and follow the registration steps, choosing the region and filling the data on the screens that appear.
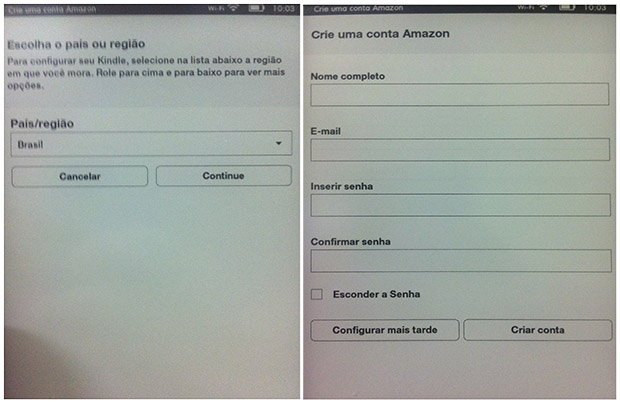 To create a new account, select the region and fill in the registration (Picture: Playback / Daniel Pinto)
– Set a password lock
To maintain the privacy of your Kindle, you can set a numeric password lock. Just follow the steps below:
Step 1. On the homepage of the Kindle, select the Settings menu at the top right and go in the “Settings” option . Among the options settings, select “Device Options.”
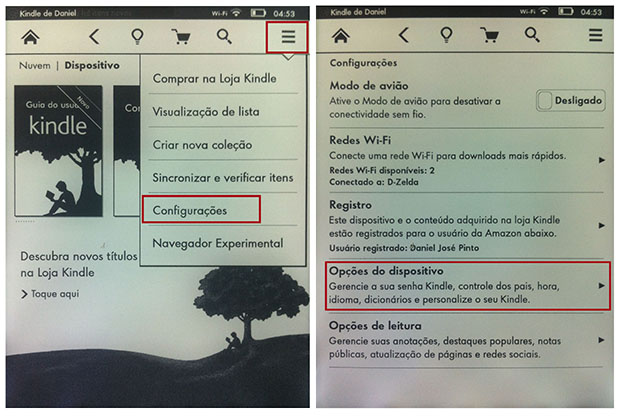 The settings menu is accessible by the icon in the upper right (Picture: Playback / Daniel Pinto)
Step 2
. On the next screen, select the “Access Code Device” and choose a sequence of up to 12 numerical digits to protect your Kindle. Repeat the code in the two fields, and select “OK” to confirm the password.
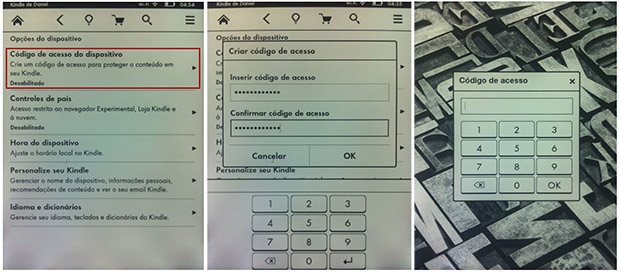 is possible to put a sequence of up to 12 numbers to protect your Kindle (Image: Playback / Daniel Pinto)
– Set the dictionary Portuguese
Once you register a Kindle, it is automatically accompanied by some dictionaries to facilitate the understanding of words in different languages. In the following steps will show how to configure the dictionary in Portuguese for the Kindle.
Step 1. In the same menu “Device options”, where we set the password protection of the Kindle, select the “Language and dictionaries.”
Step 2. On the next screen, and you can change the language of the Kindle, you can also edit the keyboard and set the dictionary for each language in the books you’re reading. Select “Dictionaries”.
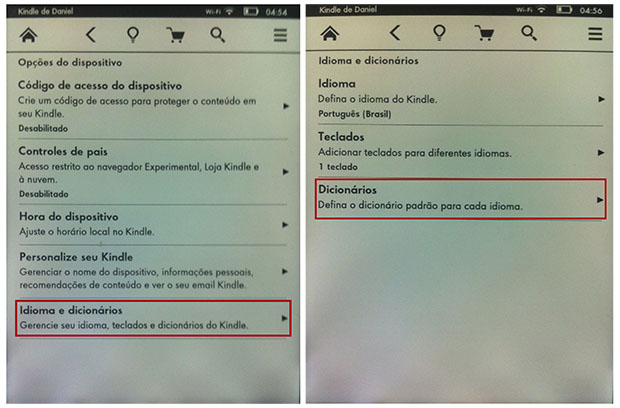 There is a menu to configure all the options and language dictionaries in Kindle (Image: Playback / Daniel Pinto )
Step 3. In this case, we have the Kindle device at no dictionary, just in the cloud. Selecting the option that appears on the screen, you will be redirected to the cloud. Browse through it to find the collection with “Dictionaries” and select it.
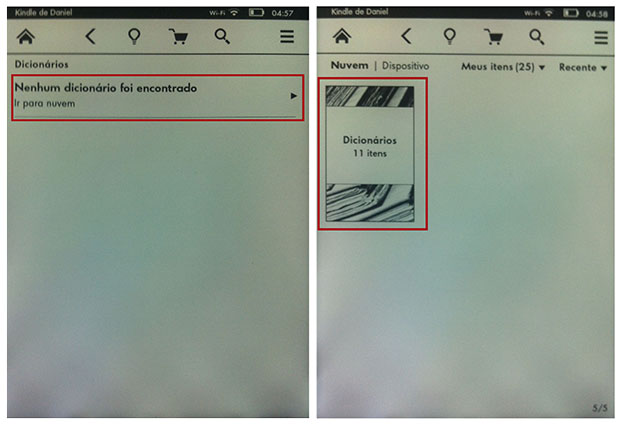 Find , cloud, collection with dictionaries available for your Kindle (Image: Play / Daniel Pinto)
Step 4. By selecting it, will show all the dictionaries available for download on your device. For the Portuguese, the Kindle uses “Priberam Dictionary of the Portuguese Language.” Just select it to start your download. At the end, returning to the configuration screen of dictionaries (Step 3), you can see that, for Portuguese, the dictionary is already defined.
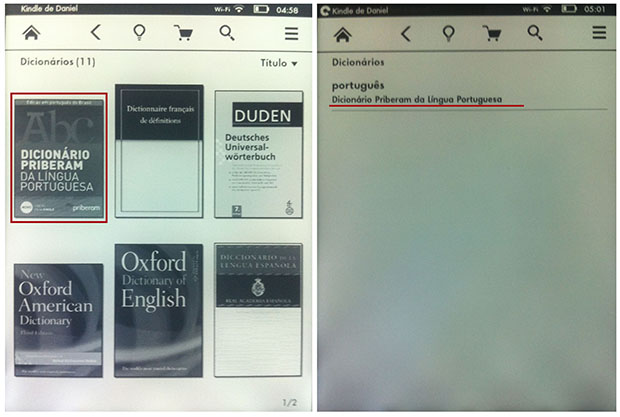 Among the dictionaries, choose ‘Priberam’ for use with books in Portuguese (Picture: Play / Daniel Pinto)
– Backup notes
Kindle is available not only as a device, but also in the form of application for multiple mobile platforms and desktop. Because of that, you can sync your notes so that they are displayed anywhere access your books or documents. To ensure this, do the following:
Step 1. In the settings menu, select “Options reading.”
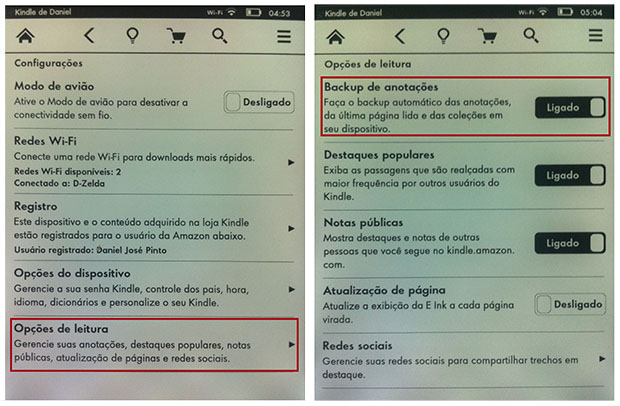 To see your notes anywhere, just activate the ‘Backup notes ‘(Image: Playback / Daniel Pinto)
Step 2
. Ensure that the option “Backup pad” is the status “Connected”.
Ready! Now that your Kindle is already with all basic settings done, just enjoy the readings. If you have any other questions, ask a question in the Forum TechTudo
-
 (Photo: Start installing BlueStacks ( Photo: Play / Bittencourt Thiago))")
Learn to run Android applications on Windows
-
 (Photo: Home screen of the smartphone and application area (Photo: Playback / Livia Damasus))")
Learn how to hide apps on Android
-
")
Learn how to sync your Windows Phone with iTunes
No comments:
Post a Comment